Adding a Custom Picture or Painting
Pro | Architectural | Suite
QUESTION
I would like to use an actual photograph or an image of a painting in my plans. How can I accomplish this task in Home Designer?

ANSWER
Adding a custom picture or painting in Home Designer involves adding the image to the Library as a material, and then applying it to an object.
Some of the most common uses for importing your images, such as photographs, would be to place them in a picture frame, apply them to a television or computer screen, or apply them to a painting canvas.
A variety of existing artwork can be found in the Library Browser by navigating to Core Catalogs> Materials> Artwork.
Additionally, more artwork is located in the Materials Art Bonus Catalog. For more information on downloading additional catalogs, please see the Related Articles section below.
To add a custom picture or painting
- In your desired plan, select View> Library Browser
 to display the Library Browser side window if it's not already open.
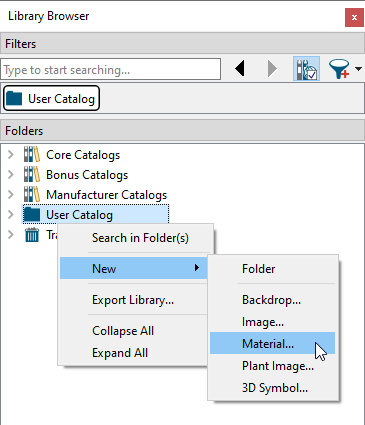
- Right-click on the User Catalog option and select New> Material.
Note: On a Mac, hold down the Control key while clicking to initiate a right-click command. More information about right-click commands on Apple input devices can be found in the following Apple resource: Right-click on Mac.
- On the Texture panel (if available) of the Define Material dialog that displays:
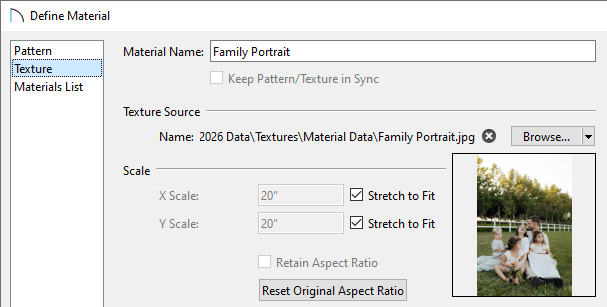
- Provide a Material Name.
- Under the Texture Source section, click Import and browse your computer for the image that you'd like to use as a custom material.
If you see Select instead of Import, either click Select to choose an image from your Asset Management, or click the drop-down next to Select and choose Import.
If you're using Traditional File Management or you're using Home Designer 2025 and prior, click the Browse button instead and browse your computer for the image that you would like to use as a custom material.
If you're using Traditional File Management and you see Edit Path instead of Browse, click the drop-down next to Edit Path and choose Browse.
- Once the picture has been selected, check the Stretch to Fit boxes. This will stretch the picture to fit the frame it will be used in, and not tile the same image across the surface per the X and Y scale parameters.
- Click OK to apply the changes, and the custom picture will be added to the Library Browser.
- Provide a Material Name.
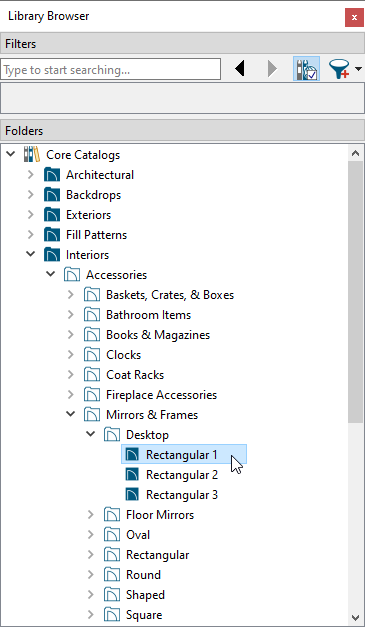
- Next, browse to Core Catalogs> Interiors> Accessories> Mirrors & Frames within the Library Browser, then select either a desk frame or a wall frame that suits your needs.
You can also locate televisions and computers by navigating to Core Catalogs> Interiors> Electronics.
In this example, the "Rectangular 1" frame is selected.
- Your cursor will now display the Furnishings (Interior)
 icon. Click once to place the frame, TV, or computer in your preferred location.
- Click on the newly placed object to select it, then click the Open Object
 edit button.
- In the Furniture Specification dialog that opens:
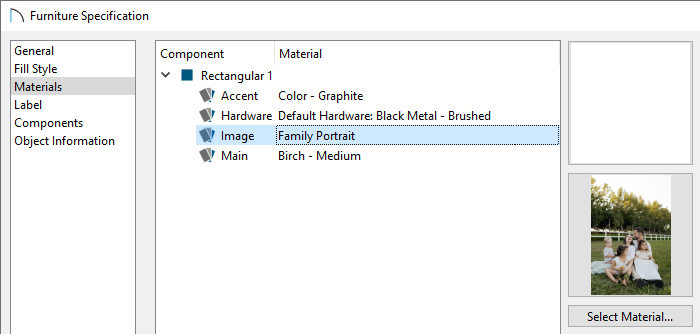
- On the Materials panel, click on the Photo, Image, or Screen component, depending on the object, then click on the Select Material button.
- In the Select Material dialog, browse to the User Catalog, click on the custom picture to select it, then click OK.
- Click OK again to close the Specification dialog and apply the change.
- On the Materials panel, click on the Photo, Image, or Screen component, depending on the object, then click on the Select Material button.
- Finally, create a Camera
 view to see the results.