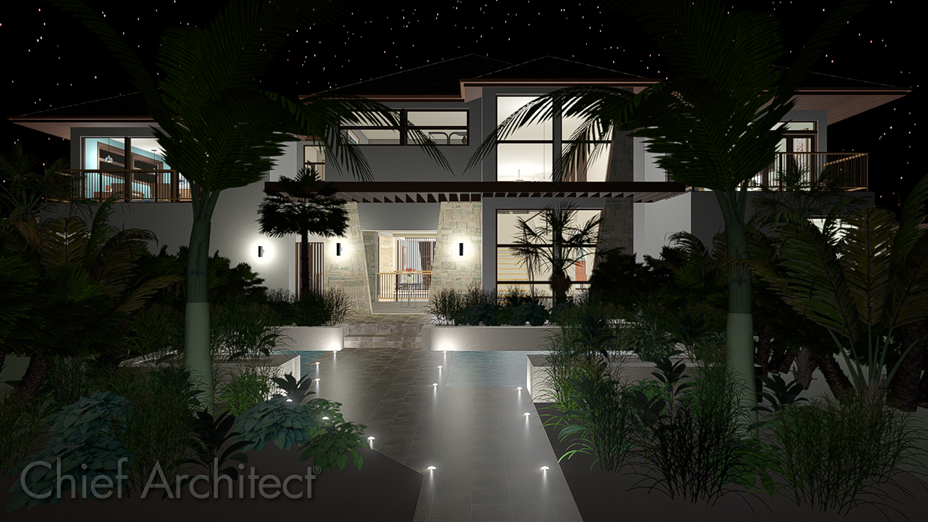
Creating a Night Scene with Exterior Lights
Pro | Architectural | Suite
QUESTION
I would like to show my building at night to illustrate the exterior lighting. How would I do that using Home Designer?

ANSWER
By adding exterior lights, disabling the sunlight, and customizing the backdrop settings, night time views can easily be simulated using Home Designer. Additional settings can also be adjusted in the Rendering Technique Options dialog.
To create a night scene
- Select Build> Electrical> Light
 , then click along the exterior of your structure to add exterior lights.
- Next, generate a camera view by navigating to 3D> Create Camera View> Perspective Full Overview
 .
.
In Home Designer Pro navigate to 3D> Create Perspective View> Perspective Full Overview .
.
- Once the camera view generates, navigate to 3D> Edit Active Camera
 .
.
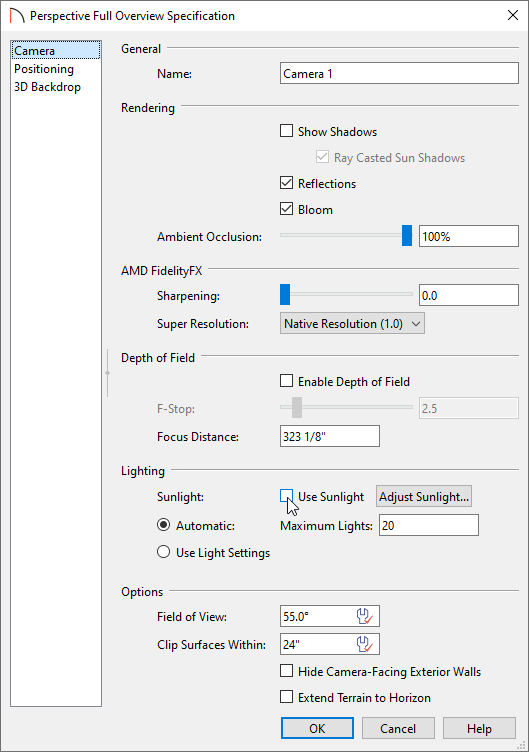
- In the Perspective Full Overview Specification dialog that displays, a variety of settings can be adjusted.

- On the Camera panel, adjust whether or not you want to display Shadows, Reflections, Bloom, and more. Uncheck the Use Sunlight box to turn off the sunlight in the view.
To learn more about the various settings located here, please click on the Help button at the bottom of the dialog to display your program's documentation.
- On the Positioning panel, adjust the position and orientation of the camera, as well as the navigation settings that control how the camera is affected when you navigate using the menus.
- On the Backdrop or 3D Backdrop panel, a backdrop image or color can be set to display. Enable the Use Generated Sky setting while the sunlight is disabled or moved below the horizon to generate a night time sky displaying stars and the moon.
Note: In Home Designer Pro, a spherical backdrop can also be specified, which allows you to wrap an image onto a sphere that surrounds the model.
- In Home Designer Pro, a Plan Display and Label panel are available, allowing for further control over the camera's callout symbol.
- Click OK to confirm the changes.
- On the Camera panel, adjust whether or not you want to display Shadows, Reflections, Bloom, and more. Uncheck the Use Sunlight box to turn off the sunlight in the view.
- Remaining in the camera view, navigate to 3D> Rendering Techniques> Technique Options
 .
.
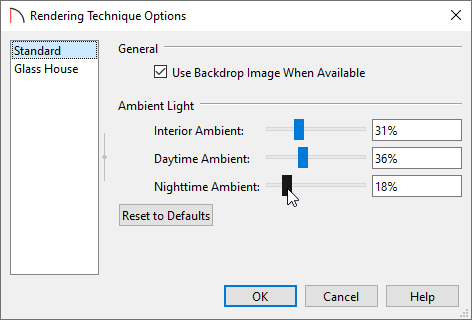
- In the Technique Options dialog that displays, you can adjust a variety of settings, which will vary depending on the rendering technique and product being used.

- On the Standard panel, which correlates to the Standard rendering technique, the Ambient Light can be adjusted. Interior Ambient affects interior views, Daytime Ambient affects exterior views when the sunlight is enabled, and Nighttime Ambient affects nighttime exterior views in which the sunlight is disabled.
Ambient lighting simulates the way light bounces around a scene, producing a basic level of uniform illumination on all surfaces. It is used in camera views and overviews using the Standard and Watercolor rendering techniques.
- On the Physically Based* panel, Exposure, Global Illumination, and Color Adjustment settings are available for views using the Physically Based rendering technique. Consider adjusting the Nighttime Background Intensity, which is the background brightness when the sunlight is toggled off. Check the Use Only Backdrop for Lighting to prevent the sunlight from lighting the scene without needing to toggle it off; this is useful for overcast daytime scenes.
*Applies to Home Designer Architectural and Home Designer Pro.
To learn more about the various settings located here, please click on the Help button at the bottom of the dialog to display your program's documentation.
- Click OK to confirm the changes.
- On the Standard panel, which correlates to the Standard rendering technique, the Ambient Light can be adjusted. Interior Ambient affects interior views, Daytime Ambient affects exterior views when the sunlight is enabled, and Nighttime Ambient affects nighttime exterior views in which the sunlight is disabled.