Adding a Light to a Piling
The information in this article applies to:

QUESTION
I am attempting to add a light to a cylindrical shape that is acting as a piling. However, when I add a light, an error message states that lights can only be added to a wall or cabinet. How do I add lights to this object?

ANSWER
Wall mounted lights cannot be added to a plan unless they are placed on walls or cabinets. It is possible, however, to place wall lights in special locations, such as on a cylindrical shape, by using a wall marked as invisible. In a 3D or elevation view, it will appear as though the lights are mounted directly to the pilings.
Begin by opening the plan in question, then determine the location where you would like to add the pilings and place the lights.
To place a wall
- From the menu, select Build> Wall> Exterior Wall
 , then click and drag to draw a wall.
- Click on the wall using the Select Objects
 tool to select it and display its edit handles. If necessary, use these edit handles to position the wall precisely where the pilings will be located. Don't draw it off to one side or another, as it needs to occupy the same space the pilings will.
Note: If you already have pilings in your drawing, move them to the side and draw a wall where the pilings once were. This wall will serve as a mounting platform for your lights but will remain unseen in 3D views.
Next, it's time to add the lights. These will need to be mounted to the wall you have just created.
To place wall lights
- If it's not already open, navigate to View> Library Browser
 to display the side window.
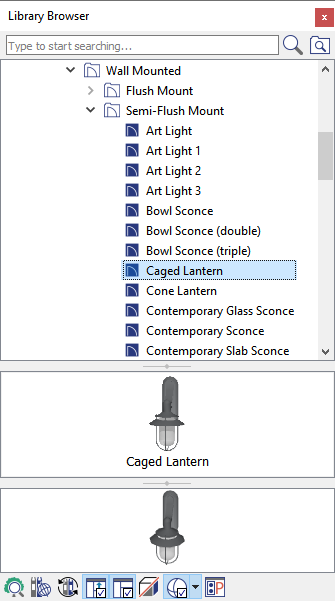
- Navigate to Home Designer Core Catalogs> Architectural> Lighting> Wall Mounted and choose a desired light object.
In this example, the Caged Lantern option is selected.

-
With the desired light selected, click in your plan to place it on a wall.
- To adjust the placement of the light, click on it using the Select Objects
 tool, then use the Move
  handle to drag it into position.
- With the light still selected, click on the Open Object
 edit button to open the Electrical Service Specification dialog to adjust the properties, such as the Height, Light Data, and Materials.
To specify the wall as invisible
- Once you have added a light or series of lights to your plan and have adjusted their properties to your liking, click on the wall using the Select Objects
 tool to select it.
- With the wall selected, click on the Open Object
 edit button to display the Wall Specification dialog.
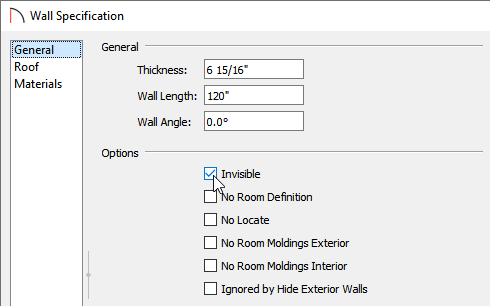
- On the General panel, under Options, place a check in the Invisible box.

- Click OK to close the dialog and apply the change.
Although you cannot place a wall light on a wall that has already been specified as invisible, a wall with lights mounted on it can nevertheless be made invisible. When the wall is converted to be invisible, the light objects that are attached to it will appear to float in space in a 3D view.
It's now time to click on the piling and drag it to the correct position.
To move existing pilings into position
- Using the Select Objects
 tool, click on a cylindrical piling to select it and display its edit handles.
-
Move
 the piling to your desired location. To move the piling without any snap or object restrictions, hold down the Ctrl/Command key on your keyboard while moving it.
Note: For more information on controlling snap settings, please see the Related Articles section below.
- Repeat this process with the other pilings. If needed, adjust the position of the lights so that they each line up with a piling.
To create new pilings
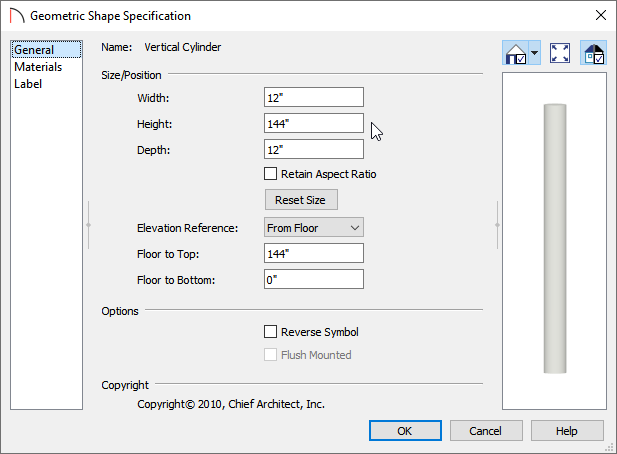
- Within the Library Browser, navigate to Home Designer Core Catalogs> Shapes> Cylinders and select an appropriate vertical cylinder.
In this example, the Vertical Cylinder option is selected.
- Click in floor plan view to place a cylindrical piling, then click on it using the Select Objects
 tool.
tool.
- Click the Open Object
 edit button to open the Geometric Shape Specification dialog, and specify the Height that you want the piling to be.

- Make any other desired adjustments, such as to the Materials, then click OK to close the dialog.
- Click the Copy/Paste
 edit button, then click where you want an exact copy of this piling to be located.
You can also use Sticky Mode if you want to continue to place copies until another tool is selected.
- Create a Camera
 view to see the results.
