Raising or Lowering a Roof Plane
Reference Number:
KB-00634
Last Modified:
December 16, 2024
This article also applies to the following legacy products:
Pro
Pro
QUESTION
I would like to change the height of one of the roof planes in my design. How do I accomplish this?
ANSWER
Roof planes generate on the wall top plates, which are governed by the ceiling height specified in a given room or floor. There are several ways to change the height of a roof plane. You can, for example, change a roof plane's height using the Transform/Replicate Object edit tool. You can also specify a new baseline height in the roof plane's specification dialog, or select and move the baseline in a 3D camera view.
To raise or lower a roof plane using the Transform/Replicate Object edit tool
- Using the Select Objects
 tool, click once on a roof plane near one of its edges to select it.
- Select the Transform/Replicate Object
 edit tool.
Note: A Question dialog may display stating "This operation creates or modifies a roof plane. With Auto Rebuild Roofs turned on, your changes will be lost the next time the roof is rebuilt. Would you like to turn Auto Rebuild Roofs off and continue with the operation?" Click Yes to disable Auto Rebuild Roofs and continue with the operation.
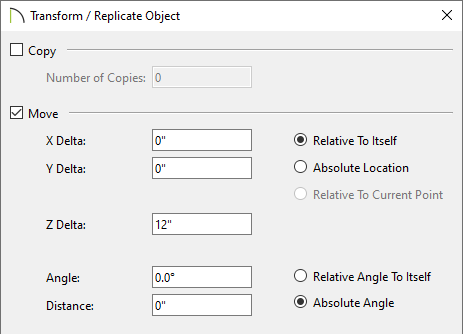
- In the Transform/Replicate Object dialog that displays:

- Check the box beside Move, which will enable the selections directly beneath it.
- To the right, select the Relative To Itself radio button so that the roof plane moves relative to its current location.
- Specify how high you want to raise the roof plane, or how low you want to lower it, in inches or millimeters.To move the roof plane up, enter a positive (+) number in the Z Delta field. To move the roof plane down, enter a negative (-) number in the Z Delta field.
In this example, we are raising the roof plane by 12".
- Check the box beside Move, which will enable the selections directly beneath it.
- Click OK to close the dialog and confirm the changes.
- Create a Camera
 view to confirm that the roof plane is in the desired location.
To raise or lower a roof plane using the Roof Plane Specification dialog
- Using the Select Objects
 tool, click once on a roof plane near one of its edges to select it.
- Select the Open Object
 edit tool.
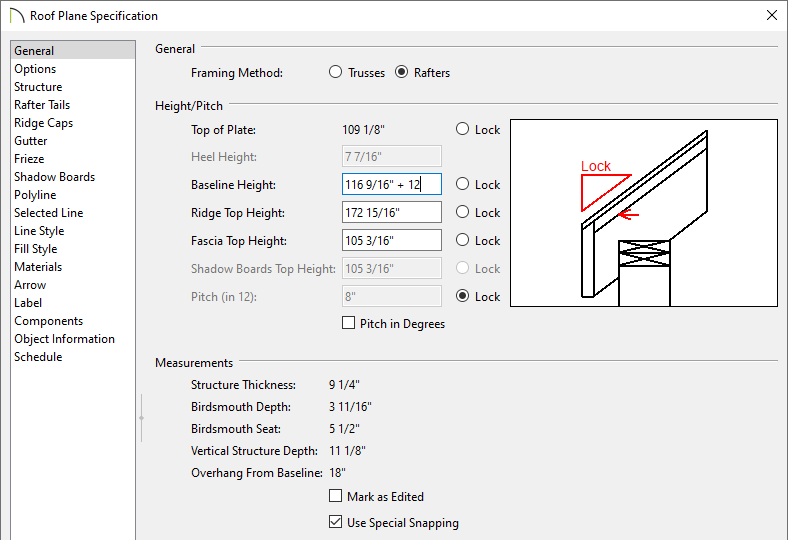
- On the General panel of the Roof Plane Specification dialog that displays:

-
Lock the Pitch (in12) to keep the pitch of the roof plane the same.
- Specify the new height for the Ridge Top Height, Baseline Height, or Fascia Top Height. You can also use addition and subtraction in the dialog by using the "+" or "-" signs. Keep in mind that adjusting one of these values will automatically adjust the other values.
In this example we have raised the Baseline Height by 12" by adding "+ 12" in the field.
-
Lock the Pitch (in12) to keep the pitch of the roof plane the same.
- Click OK to close the dialog and confirm the changes.
Note: A Question dialog may display stating "This operation creates or modifies a roof plane. With Auto Rebuild Roofs turned on, your changes will be lost the next time the roof is rebuilt. Would you like to turn Auto Rebuild Roofs off and continue with the operation?" Click Yes to disable Auto Rebuild Roofs and continue with the operation.
- Create a Camera
 view to confirm that the roof plane is in the desired location.
Related Articles