Creating a Garden Shed
Pro | Architectural | Suite
QUESTION
I would like to design a shed for my garden that will be used for storage and a work space for a potting bench. Do you have any suggestions?

ANSWER
Outdoor sheds are a popular solution for storage needs and can also be used to create a sheltered place to work on outdoor projects such as potting plants or maintaining outdoor tools. There is no limit to the variety of styles that a storage shed can take, from a basic, store-bought unit to a custom-built structure. In this example, we will create a relatively simple structure with a roof that is partially enclosed to provide secure storage and an open work area.
This article will cover the following:
- To create an enclosed shed
- To create an open work area
- To add support for the work area roof
- To create a work area with an earth floor
To create an enclosed shed
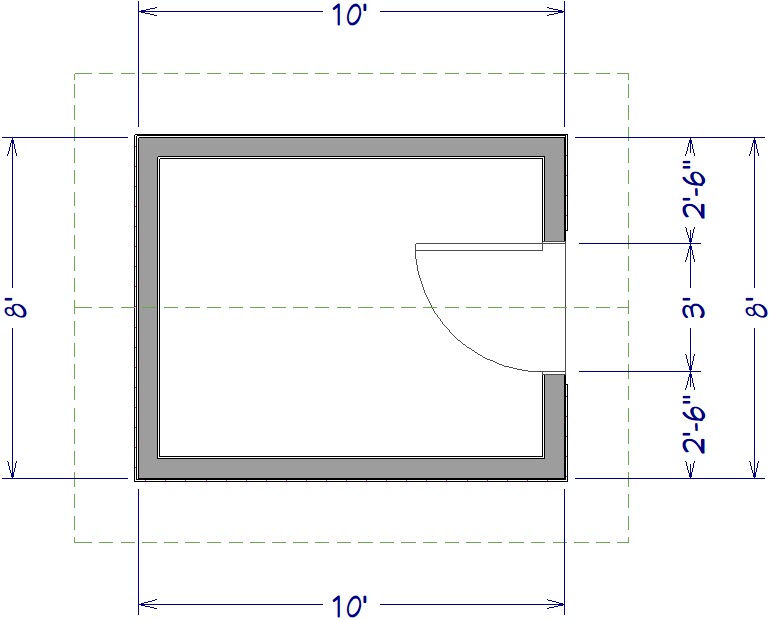
- Select Build> Wall> Straight Exterior Wall
 from the menu, then click and drag to draw the basic outline of your shed.
- Don't worry about placing the walls precisely as you draw them - they can be easily moved into position in a moment.
- In this example, the Auto Rebuild Roof feature is enabled, so as soon as your walls enclose an area, the program will build a roof over it. As changes are made to the exterior walls, the roof will automatically update. Auto Rebuild Roof can be enabled or disabled by selecting Build> Roof> Build Roof
 from the menu.
- Don't worry about placing the walls precisely as you draw them - they can be easily moved into position in a moment.
- Select CAD> Dimensions> Auto Exterior Dimensions
 from the menu to create dimensions around the exterior of your structure. You can use these dimensions as a guide when resizing the building.
- Using the Select Objects
 tool click on a wall to select it., and then click on one of the exterior dimensions to see the wall length.
In this example a shed measuring 8 feet (') by 10 feet (') is created.
For more information on moving walls or other objects using dimensions, please see the Related Articles.

- By default, the program will draw a hip roof over the structure. If you would like a gable roof instead, use the Select Objects tool to select the wall that you would like to build a gable over, then click on the Open Object
 edit tool.
- On the Roof panel of the Wall Specification dialog that displays, change the roof option from Hip Wall to Full Gable Wall, then click OK.
Note: You may want your shed to have a different pitch than other structures in your plan. For information on adjusting the pitch on specific walls please see the Related Articles below.
- Select Build> Door> Hinged Door
 from the menu, then click on a wall to place a door at that location.
- To center the door along the wall, use the Select Objects tool, click on the door to select it, use the Center Object
 edit tool, and click once in an empty space inside the shed near the wall that the door is located in.
- By default, this room area has a framed floor platform that is 12 inches deep. If you would prefer a 4" slab instead you will need to change the Room Type to Porch. To make this change, use the Select Objects tool, click in an empty space on the floor of the work area, then click the Open Object edit tool.
- In the Room Specification dialog that displays:
- On the General panel select Porch from the Room Type drop-down list.
- On the Structure panel uncheck the option for Build Foundation Below.
- If you'd like a vaulted ceiling, uncheck the option for Flat Ceiling Over This Room and then check the box for Use Soffit Surface for Ceiling.
- Remaining on the Structure panel you will likely need to lower the floor, which can be done by adjusting the Floor value underneath Absolute Elevations.
In this example the floor is set to -16.5".
- Click OK when you're done with your changes.
Note: Once you lower your floor, you may need to establish your Rough Ceiling heights again, as they may not automatically adjust when lowering the floor.
- On the General panel select Porch from the Room Type drop-down list.
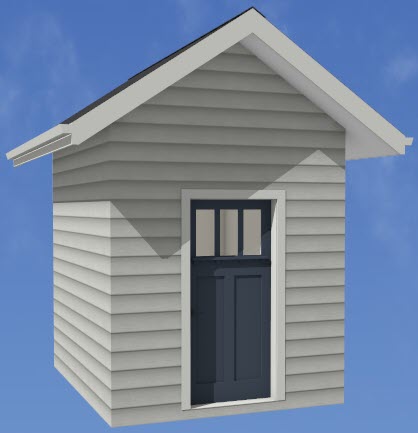
- Select 3D> Create Camera View> Full Camera
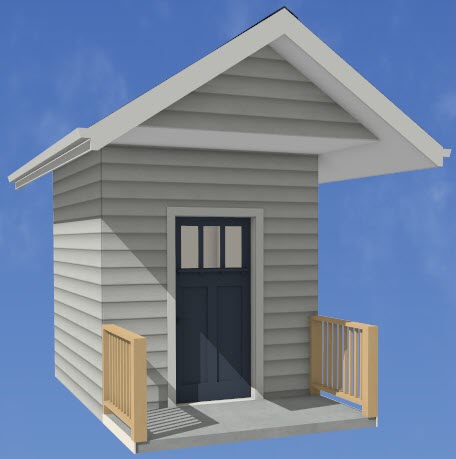
 from the menu, then click and drag a camera arrow towards the outside of your shed to see the results so far.
In Home Designer Pro, select 3D> Create Perspective View> Full Camera instead.
Now that we have our basic shed lets create the open work area.
To create an open work area
- Select File> Close from the menu to close the camera view and return to floor plan view.
- Select Build> Railing and Deck> Straight Railing
 from the menu, then click and drag to draw in railings.
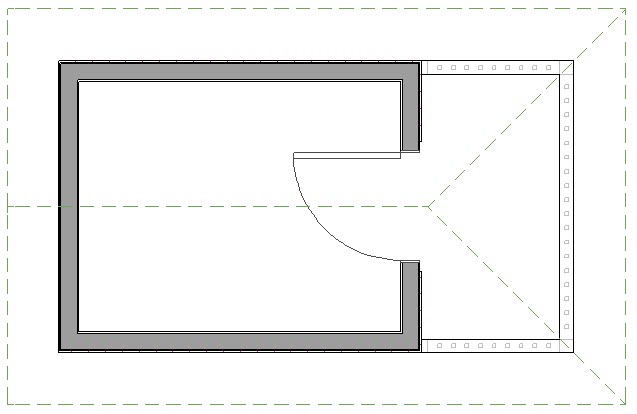
- Using the Select Objects tool, click on the railing that will have the gable roof above to select it., then click on the Open Object edit tool.
- On the General panel of the Railing Specification dialog that opens, check the Invisible box.
- On the Roof panel, choose the option for Full Gable Wall and click OK.
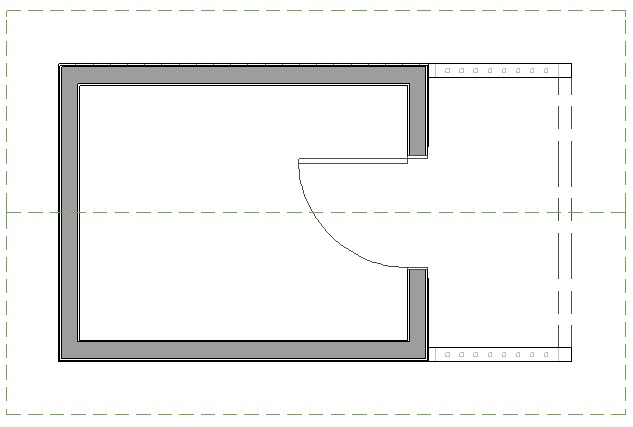
- By default, this room area has a framed floor platform that is 12 inches deep. If you would prefer a 4" slab instead you will need to change the Room Type to Porch. To make this change, use the Select Objects tool, click in an empty space on the floor of the work area, then click the Open Object edit tool.
- In the Room Specification dialog that displays:
- On the General panel select Porch from the Room Type drop-down list.
- On the Structure panel uncheck the option for Build Foundation Below.
- If you'd like a vaulted ceiling, uncheck the option for Flat Ceiling Over This Room and then check the box for Use Soffit Surface for Ceiling.
- Remaining on the Structure panel you will need to lower the floor to the same value you as the shed, which can be done by adjusting the Floor value underneath Absolute Elevations.
In this example the floor is set to -16.5".
- Click OK when you're done with your changes.
Note: Once you lower your floor, you may need to establish your Rough Ceiling heights again, as they may not automatically adjust when lowering the floor.
- On the General panel select Porch from the Room Type drop-down list.
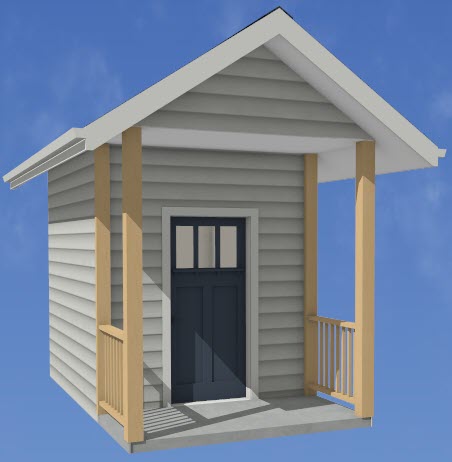
- Select 3D> Create Camera View> Full Camera from the menu, then click and drag a camera arrow towards the outside of your shed to see your progress.
In Home Designer Pro, select 3D> Create Perspective View> Full Camera instead.
Now we want to put in some posts to hold the over hanging roof.
To add support for the work area roof
- Select File> Close from the menu to close the camera view and return to floor plan view.
- Using the Select Objects tool, select the side railing of your work area, then click the Open Object edit tool.
- In the Railing Specification dialog that displays:
- On the Rail Style panel set your Railing Type to your desired type.
In this example Balusters is used.
- Set your Newels/Posts to Post to Ceiling to create support posts.
Alternatively you could use Post to Beam if you'd like a support beam.
- On the Newels/Balusters panel set your Height to the height of your railing.
- Set your Width to the width of your support posts.
In this example 5 1/2" is used.
- On the Rails panel you can adjust the Width and Height of your rails, along with the Width and Height of your support beam, if chosen above.
- On the Materials panel, change your Exterior Wall Surface to match either your slab or wall material.
In this example it is changed to the Concrete material.
- On the Rail Style panel set your Railing Type to your desired type.
- Repeat Steps 2 - 3 above on the other railing of your work area.
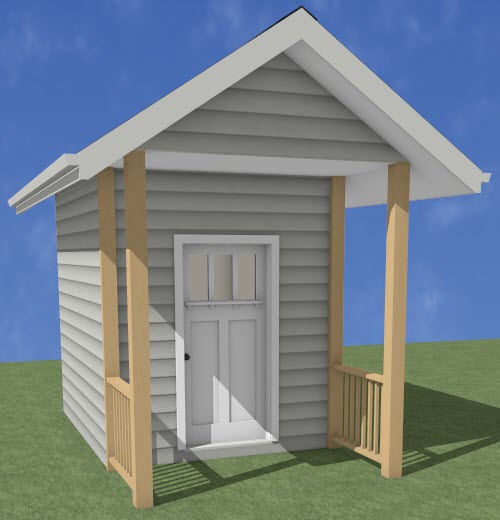
- Create a camera view 3D> Create Camera View> Full Camera to see the results of your work.
In Home Designer Pro, select 3D> Create Perspective View> Full Camera instead.
Some work areas may sit directly on the terrain, meaning you will need to remove the floor from your work area.
To create a work area with an earth floor
- If your plan does not have a terrain perimeter, select Terrain> Create Terrain Perimeter
 from the menu.
- Using the Select Objects objects tool, click in an empty space on the floor of the work area, then click the Open Object edit tool.
- In the Room Specification dialog that displays:
- On the General panel select Open Below from the Room Type drop-down list
- On the Structure panel uncheck the option for Build Foundation Below.
- Remaining on the Structure panel you will need to lower the floor to sit on the terrain, which can be done by adjusting the Floor value underneath of Absolute Elevations.
In this example the floor is set to -21".
- Click OK when you're done with your changes.
Note: Once you lower your floor, you may need to establish your Rough Ceiling heights again, as they may not automatically adjust when lowering the floor.
- On the General panel select Open Below from the Room Type drop-down list
- Select 3D> Create Camera View> Full Camera to create an outside view of the work area.
In Home Designer Pro, select 3D> Create Perspective View> Full Camera instead.
Note: You can use objects from the Library Browser to customize and decorate your garden or your shed. Additional catalogs can be found on our 3D Library page. For more information on obtaining these libraries please see the Related Articles.