Modifying Materials
The information in this article applies to:

QUESTION
I found a material in the library that I would like to modify and then use in different plans. How can I do this?
ANSWER
Existing materials can be copied and modified, then applied to individual walls, entire rooms, or specific surfaces.
The Adjust Material Definition tool is useful for quickly changing plan materials directly from a 3D view, however, changing a material's definition with this tool affects all objects in the current plan that are using this material.
If you wish to customize a material that you see in the Library Browser and make those changes available for use in other plans or for exporting, begin by creating a copy of the material and then modify it as needed.
To make a copy of a material
- Select View> Library Browser
 and locate a material that you would like to modify.
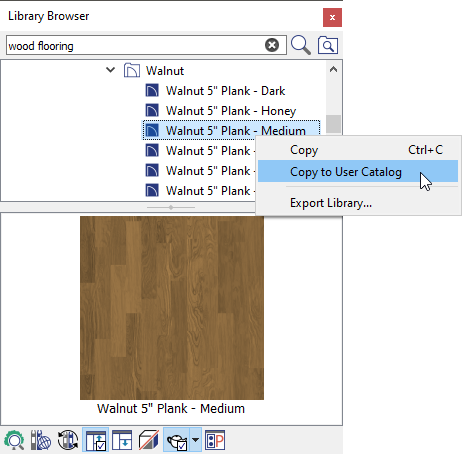
- Right-click on the text that is specified as the Material's name and select Copy to User Catalog.
In Home Designer 2021 and prior versions, select the Copy option, then right-click on the User Catalog folder and select Paste.
In this example, we are making a copy of the "Walnut 5" Plank - Medium" material found in the Home Designer Core Catalogs.
To modify a copied material
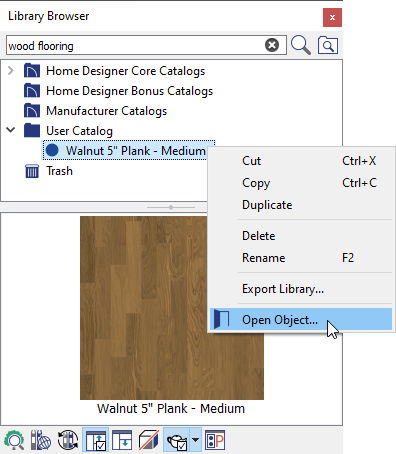
- Right-click on the copied material located in your User Catalog folder, then select Open Object.
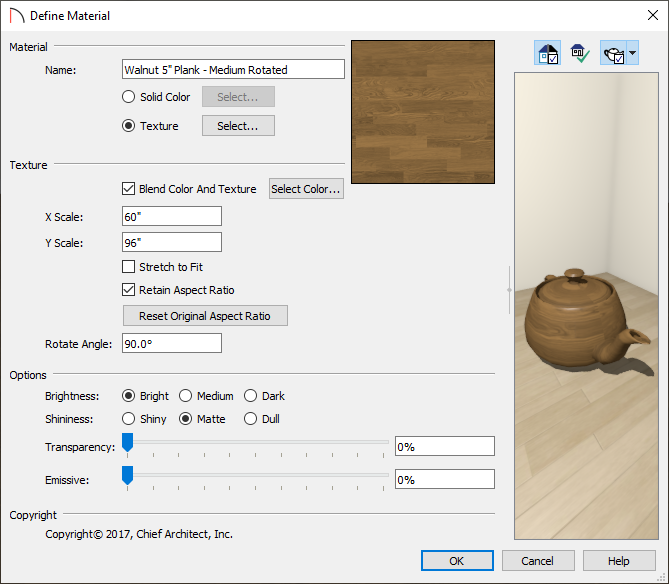
- The Define Material dialog will display. In Home Designer Architectural and Home Designer Pro, select the Texture panel.
Note: The display of the dialog image below may vary slightly between the different product versions of Home Designer.
-
Enter a Name for the copied material.
In this example, we the word "Rotated" was added to the end of the name.
-
The Scale as well as the Rotate Angle can be modified to your liking.
In this example, the scale is unchanged, but the rotate angle has been set to 90 degrees.
-
Adjust any of the settings under the Options section to change how bright, shiny, transparent, and emissive the texture is.
-
For more information on the settings located in this dialog, select the Help button at the bottom to open your program's documentation.
-
Enter a Name for the copied material.
-
In Home Designer Architectural and Home Designer Pro, you'll also have control over the pattern of the material, which is what's displayed in the Technical Illustration and Vector View rendering techniques. On the Pattern panel:
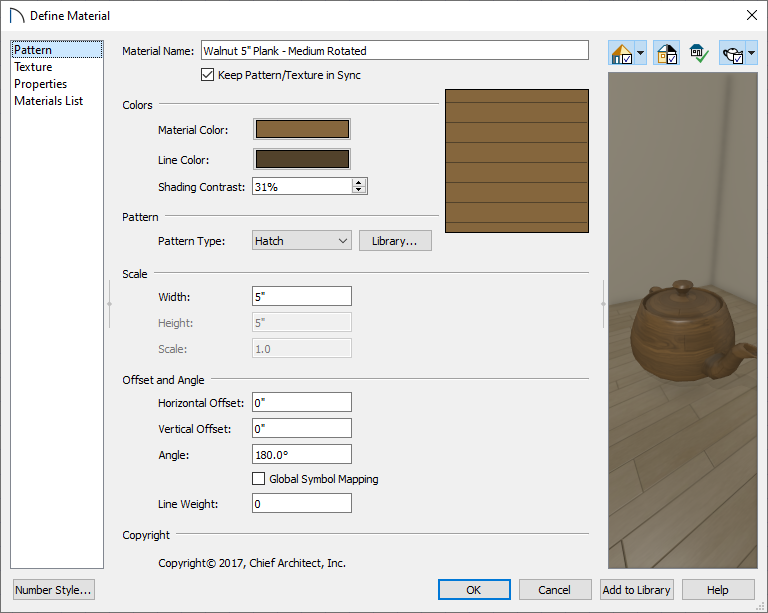
- The Name of the material can be modified here, just like the Texture panel in the previous step.
- The Material and Line Color options can be modified by left-clicking the adjacent color boxes.
- The Pattern Type can be changed through the drop-down menu, or by browsing your library using the Library button.
- The Scale and Offset and Angle properties can also be specified for the material's pattern.
You can also check the Keep Pattern/Texture in Sync box to maintain consistent Scale and Offset and Angle settings for both the selected material's pattern and its texture if any of these settings are modified.
- Starting in Home Designer Pro 2022, an Add to Library button is also available, allowing you to create several different material variations and add them directly to the User Catalog without closing the dialog.
- The Name of the material can be modified here, just like the Texture panel in the previous step.
- Select OK to confirm your changes.
To apply a modified material
- Using the Select Objects
 tool, select an object that you would like to apply the modified material to, then click the Open Object
  edit button.
- On the Materials panel of the Specification dialog that displays, select the Component that you would like to change, then click on the Select Material button.
In this example, a room is opened to specification and the Floor Finish component is selected.

- In the Select Material dialog that displays, navigate to the User Catalog folder, select your modified material, then click OK.
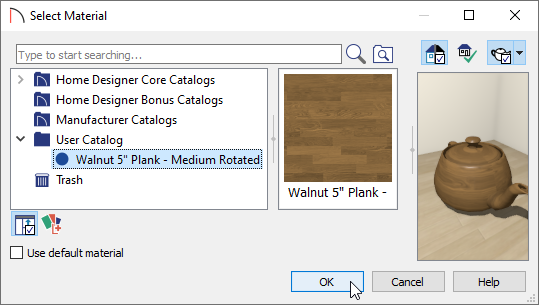
- Once you have finished updating your materials, click OK to close the dialog.
You can also use the Material Painter in a Camera view to apply materials to objects or components. To learn more about applying materials, please see Video #2289: Applying Materials in 3D.