Customizing an Accessible Bathroom
The information in this article appliesto:

QUESTION
I would like to create an accessible bathroom, with elements such as a countertop without any cabinets below it, and half height walls. How can I create these in Home Designer?

ANSWER
There are many elements to consider when modeling a bathroom. For the purposes of this article, we will describe how to create a countertop without cabinetry beneath it, add corbels, and adjust the position of the sink. We will also look at how to create half walls, also known as partial height walls, for creating an enclosed shower space "room" which allows for adjusting the rooms materials for the shower separate from the rest of the room.
To create a countertop
- First, launch Home Designer and choose to Open
 the plan in which you want to create the bathroom, or start a New Plan
  .
.
- Next, select Build> Cabinet> Base Cabinet
 , and click in the drawing area of your plan to place a single Base Cabinet.
Note: Both Home Designer Architectural and Home Designer Pro have a Custom Countertop tool, which provides the ability to create custom, closed-polyline based objects, which can be selected and edited independent of cabinets.
For more information, please review the "Creating a Custom Shaped Countertop" resource located in the Related Articles Section below.
- Using the Select Objects
 tool, click on the Base Cabinet to select it, then select the Open Object
  edit tool.
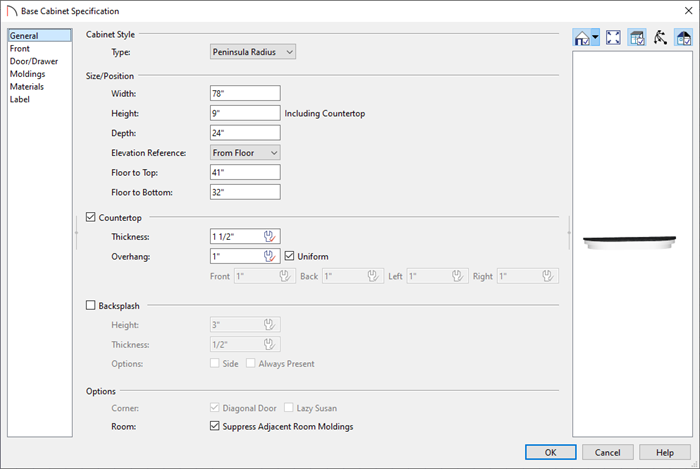
- On the General panel of the Base Cabinet Specification dialog that displays:

- Change the Type drop-down to Peninsula Radius.
- Set the Height to 9", the Width to 78", and the Depth to 24".
- Set the Floor to Bottom value to 32".
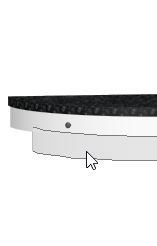
- Using the 3D preview on the right, select the Toe Kick component, as shown in the image below, then Delete it.

- Click on the drawer component using the same 3D preview, then click the Delete button to remove the drawer as well.
- Click OK once the countertop is to your liking.
- Change the Type drop-down to Peninsula Radius.
- On the Materials panel, you can change the material for the Countertop and remainder of the cabinet.
- Once you have completed making changes, click OK to apply them.
To add corbels
- Next, select Library Browser
 which allows you to add content to your drawings.
- For the purposes of our example, browse to Home Designer Core Catalogs> Architectural> Millwork> Corbels, then select and place two Ogee corbel objects in the drawing area beneath the countertop for support.
- You can either raise the corbels while in a Camera view, or use the Select Objects
 tool to select them and click on the Open Object
  edit tool to display the Millwork Specification dialog, which allows you to set the Floor to Bottom value.
- Choose to add a sink from the Library Browser by navigating to Home Designer Core Catalogs> Architectural> Fixtures> Sinks> Bathroom Sinks
- You can either raise the corbels while in a Camera view, or use the Select Objects
In Home Designer Architectural and Home Designer Pro, you can adjust the location of a sink after it has been placed. To do so, select the countertop, click on the Select Next Object edit tool or Tab key on your keyboard to select the sink, then use its Move edit handle to adjust its location.
To create a half wall, or partial height wall
- Select Build> Wall> Straight Half Wall
 or Curved Half Wall
  then click and drag out the half wall(s) in your plan.
- Once you have placed a half wall, or solid railing, use the Select Objects
 tool to select it, and click on the Open Object
  edit tool to display the Railing Specification dialog.
- On the Newels/Balusters panel, specify the Railing Height that you want your half wall to be.
- On the Materials panel, you can specify the Interior and Exterior surfaces of the half wall, as well as adjust the Rail.