Defining a Wall Type in Home Designer
The information in this article applies to:

QUESTION
I would like to customize or create a new wall type in my plan. How can I do this?
ANSWER
Home Designer has a variety of wall types that you can readily use in any of your plans. You also have the ability to copy and create your own custom wall type using the Wall Type Definitions dialog.
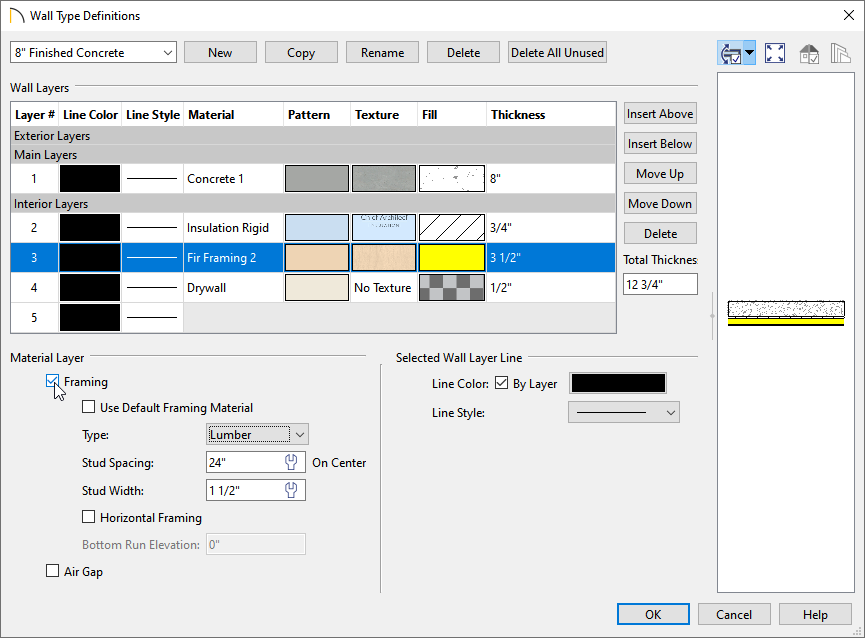
In this example, a concrete foundation wall type will be modified to include a layer of rigid insulation, fir framing, and drywall.
To create a custom wall type
-
Open
 the Home Designer plan in which you would like to create a new wall type.
- Navigate to Build> Wall> Define Wall Types
 .
.
Note: Additionally, this dialog can be accessed by clicking the Define button on the Wall Types panel of the Wall Specification dialog or in the Wall Defaults dialog.
- In the Wall Type Definitions dialog that opens, notice that a drop-down menu is available in the top left corner which consists of an assortment of wall types available within the plan.
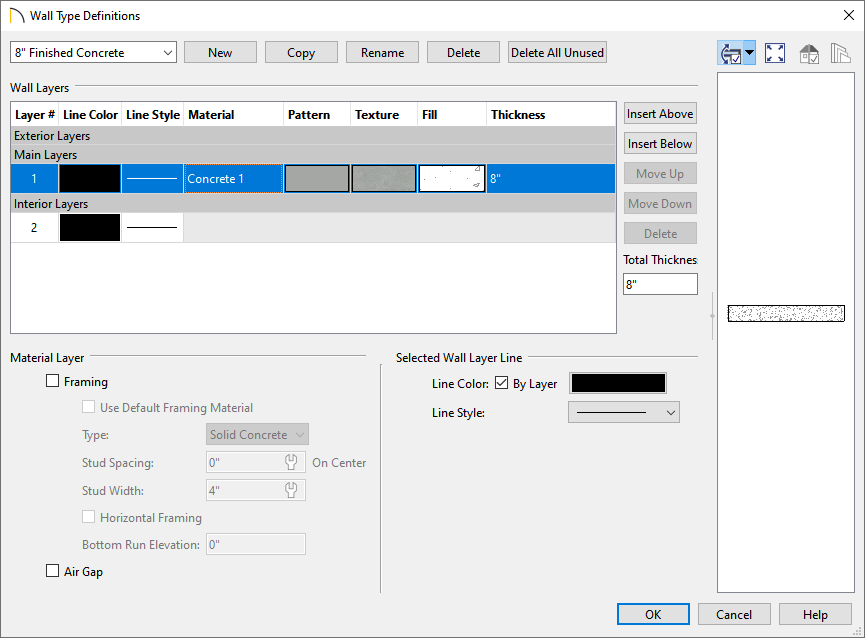
- Click the New button at the top of the dialog, or click Copy to copy an existing wall type.
In this example, we selected the 8" Concrete Stem Wall wall type and copied it.
Depending on the new wall type you wish to create, you may be able to save time by selecting a similar preexisting wall type from the drop-down list at the top of the Wall Type Definitions dialog and copying it.
- Replace the wall type name with a short, descriptive name of your choice.
In this example, we renamed the wall to "8" Finished Concrete."
- Click the New button at the top of the dialog, or click Copy to copy an existing wall type.
- The selected wall type’s layers are listed here and are divided into three sections: Exterior, Main, and Interior Layers. Use the Move Up and Move Down buttons to move layers around. Additional layers can be added using the Insert Above or Insert Below buttons, and layers can be deleted using the Delete button.
In this example, we will be adding three interior wall layers to our custom wall type, so go ahead and click on the Interior Layers section heading, then click the Insert Below button until we have a total of four layers: one layer in the Main Layers section and three layers in the Interior Layers section.
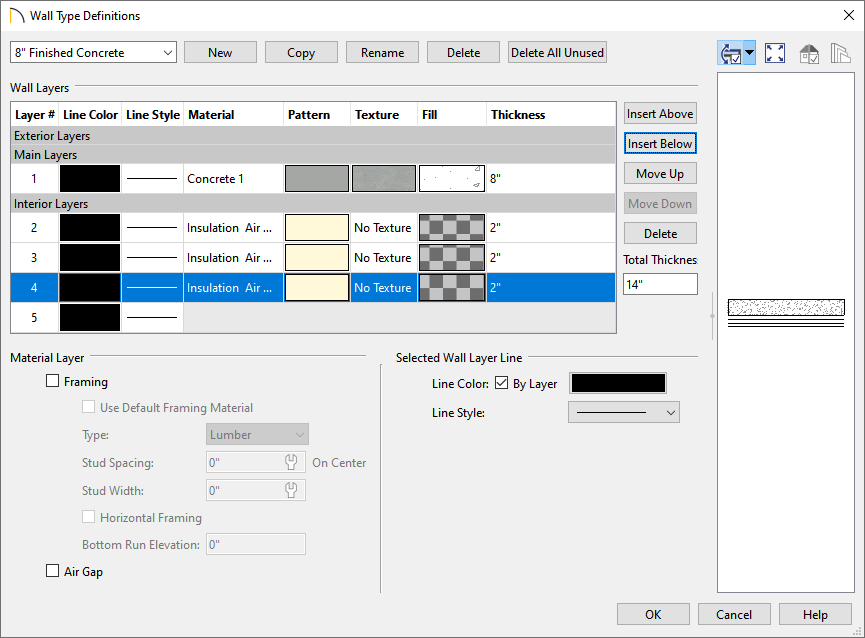
- The thickness of a layer can be modified by clicking in the text field of a layer's Thickness column and entering your desired value.
For the purposes of our example, the thickness for each of the layers are as follows:
- Layer 1 = 8"
- Layer 2 = 3/4"
- Layer 3 = 3 1/2"
- Layer 4 = 1/2"
- Layer 1 = 8"
- To change the material of a layer within a wall type, first select the layer that you wish to change, then click on the Texture column for that layer.
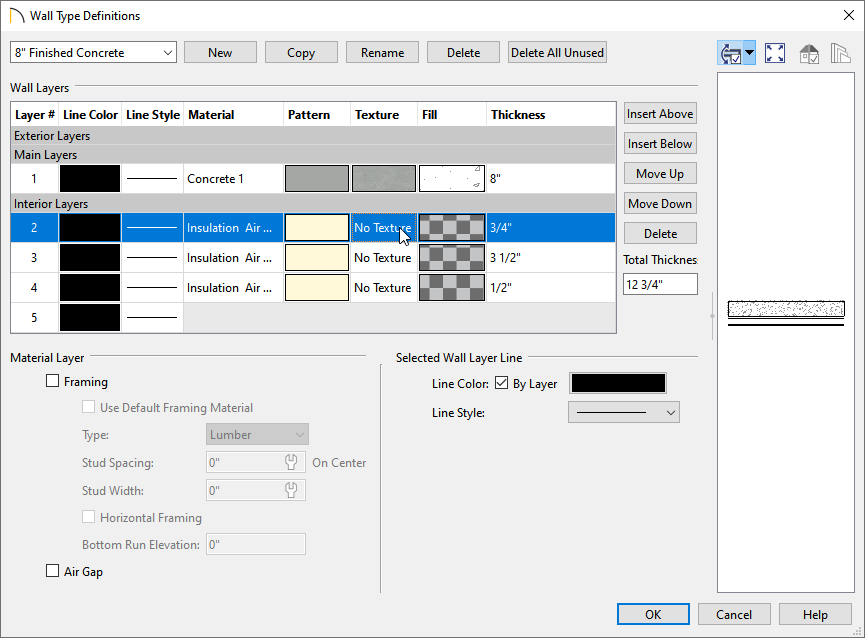
- The Select Material dialog will open next. Navigate to the material that you would like to use, then click OK to return to the Wall Type Definitions dialog.
- Repeat steps 6 and 7 to set the Texture for each wall layer that is part of this wall type.
For the purposes of our example, the materials for each of the layers are as follows:
- Layer 1 = Concrete 1
- Layer 2 = Insulation Rigid
- Layer 3 = Fir Framing 2
- Layer 4 = Drywall
- Layer 1 = Concrete 1
-
The fill style of wall layers can also be changed. This can be done by first selecting a layer with a fill style you wish to change, then clicking on the Fill column for that layer.
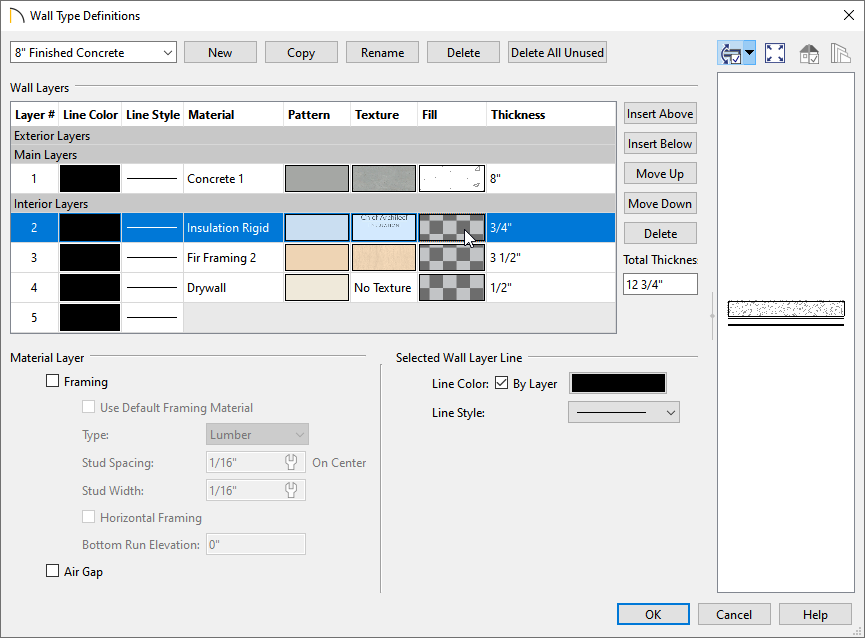
- The Layer Fill Style dialog will appear. Use the Pattern Type drop-down menu or the Library button to specify your desired fill style, along with any other of the various settings located in this dialog. Once your desired changes have been made, click OK to return to the Wall Type Definitions dialog.
- Repeat steps 9 and 10 to set the Fill for each wall layer.
For the purposes of our example, the fill style for each of the layers are as follows:
- Layer 1 = Default Concrete fill style
- Layer 2 = Hatch, Angle fill style
- Layer 3 = Solid Yellow fill style
- Layer 4 = No fill style
- Additional properties, such as the Line Color, Line Style, and Line Weight* can also be changed by first selecting the layer that you wish to change, then using the appropriate options located within the Select Wall Layer Line section.
*The Line Weight for each individual wall layer can only be adjusted in Home Designer Pro.
- In the Material Layer section, specify whether a selected wall layer has special attributes. Check the Framing box to produce framing in the selected layer when wall framing is generated. Check the Air Gap box to prevent a selected layer from displaying in 3D views or being calculated in the Materials List.
In this example, Layer 3 is marked as framing. Notice that additional attributes associated with framing can be specified here, including the Type, Stud Spacing, Stud Width, and more.
To learn more about each of the options listed under the Material Layer section, click on the Help button located at the bottom of the dialog to open your program's documentation.
- In Home Designer Pro, a Wall Settings section is available, which includes the following settings:
-
Build Platform to Exterior of Layer - Select a wall layer from the drop-down list to build floor and ceiling platforms to. By default, the exterior side of the outermost Main Layer is selected.
Note: If Build Platform to Exterior of Layer is set to the exterior wall layer, no siding material will generate to cover the floor platform.
- Dimension to Exterior of Layer - Select the wall type’s Dimension Layer from the drop-down list. By default, the outermost Main Layer is selected. This setting does not affect Interior Dimensions.
-
Build Platform to Exterior of Layer - Select a wall layer from the drop-down list to build floor and ceiling platforms to. By default, the exterior side of the outermost Main Layer is selected.
- Once all desired changes have been made to the custom wall type, click OK.
To change existing walls to use the custom wall type
- With the Select Objects
 tool, select the wall that needs to be changed and click the Open Object
  edit button.
- In the Wall Specification dialog that opens, use the Wall Type drop-down menu to select the custom wall type, then click OK.
In Home Designer Pro, select the Wall Types panel to access the Wall Type drop-down menu.
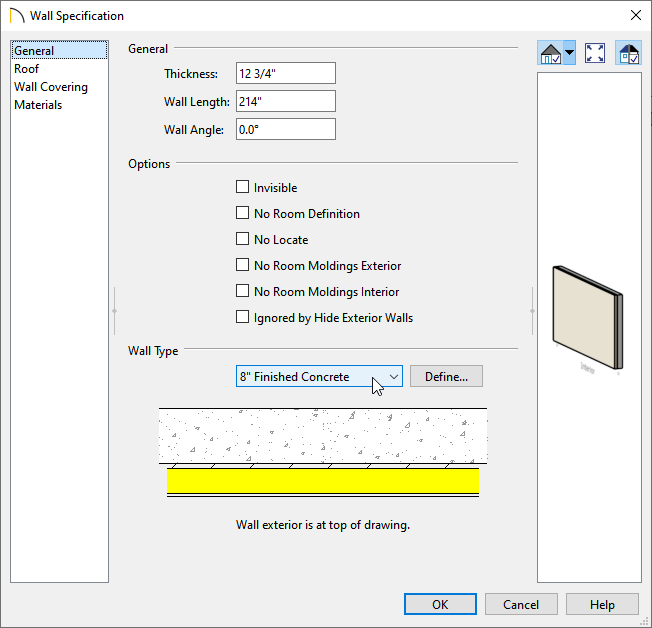
You can hold down the Shift key on the keyboard, then click on each wall you would like to change to group them into a single selection. Once group selected, the walls can be opened and edited all at once.
To set the custom wall type as the default
- Select Edit> Default Settings
 , and in the dialog that displays, expand the Walls category.
- Select the wall option of your choice, then click Edit.
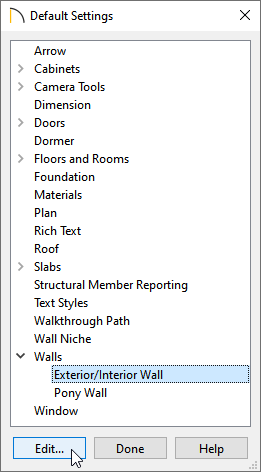
- Use the desired Wall Type drop-down menu located within the Wall Defaults dialog to select the custom wall type.
In Home Designer Pro, select the Wall Types panel to access the Wall Type drop-down menu.
- Click OK and Done to close the dialogs.
Now, any new walls that you create will use your modified wall type.