Troubleshooting Framing Issues in Home Designer Pro
The information in this article applies to:

DESCRIPTION
Some walls, floors, and ceilings are not generating framing. Why is this, and how do I resolve this issue?
RESOLUTION
Floor framing for the first floor will not generate without the presence of a foundation. If a foundation has been generated, floor and ceiling framing may not generate if certain attributes located within the Room Specification dialog are not checked or if the Floor and/or Ceiling Structure is defined incorrectly.
Wall framing will not regenerate if Retain Wall Framing is turned on or if the framing layer of the wall is not specified as framing or is using a non-framing material.
To ensure that floor and ceiling framing generates properly
-
Open
 the plan that is not framing correctly.
- If you're unable to create floor framing for your first floor, you likely have not generated a foundation. Navigate to Build> Floor> Build Foundation
 and generate a foundation for your structure.
- If you're encountering other issues with floor and/or ceiling framing and a foundation has been created, determine the area or room in which your structure is not framing correctly. Using the Select Objects
 tool, click to select the room, then click on the Open Object
  edit tool.
- On the Structure panel of the Room Specification dialog that displays, ensure that Roof Over This Room and Flat Ceiling Over This Room are checked, as well as Floor Under This Room.
If Flat Ceiling Over This Room is unchecked, the ceiling will follow the pitch of the roof, unless custom ceiling planes have been created.
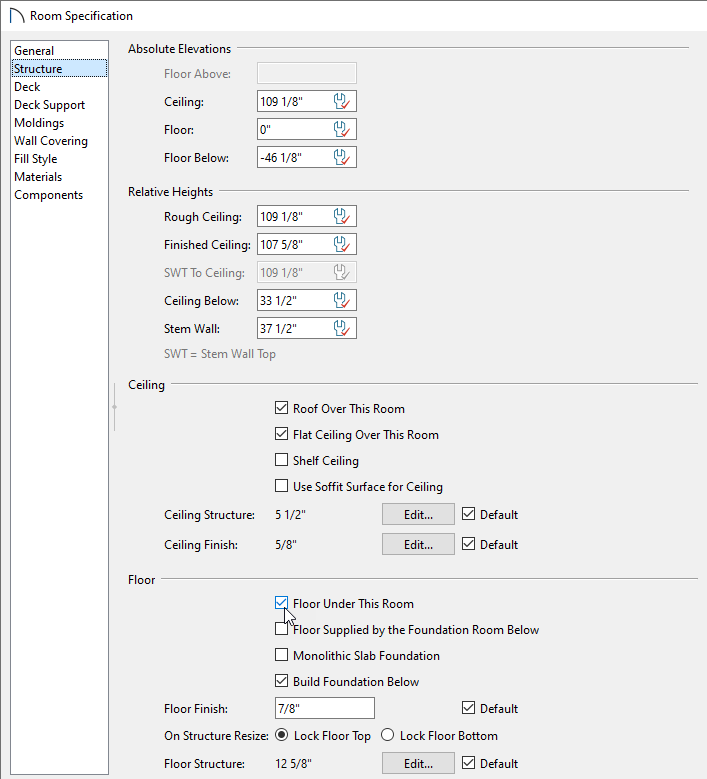
- Next, verify that the Floor Structure and Ceiling Structure are defined correctly by selecting the Edit button.
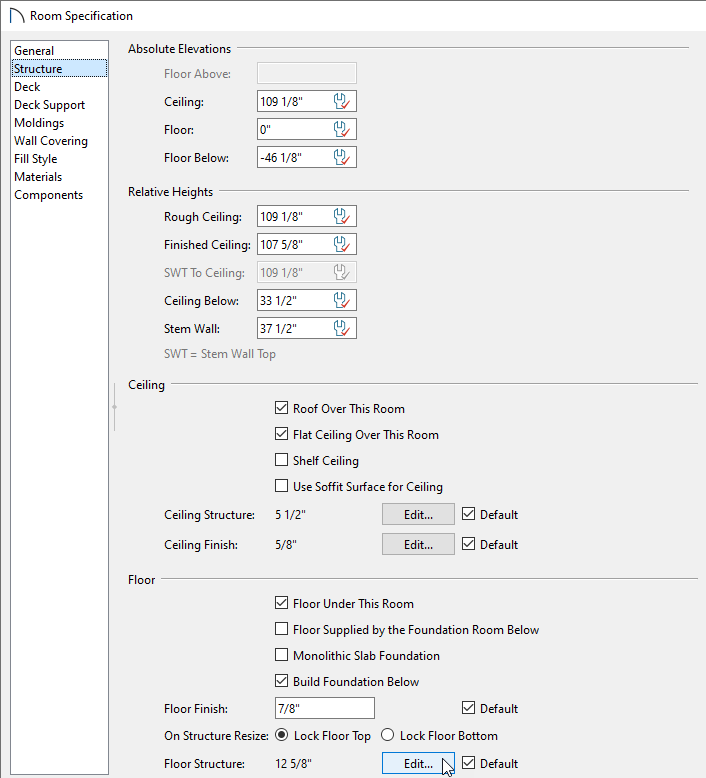
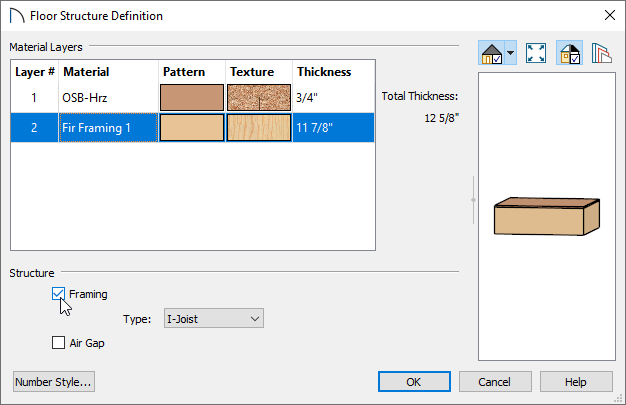
- In the Floor/Ceiling Structure Definitions dialog(s), ensure that a framing layer is present with the Framing box checked, and that the correct Thickness is set.
In Home Designer Pro 2021 and prior versions, make sure that the layer that will act as the floor or ceiling framing is using a framing material, such as Fir Framing, and the appropriate Structure Type is selected.
Note: If floor and ceiling framing is not generating correctly for specific room types, an entire floor, or for the entire plan, it's possible that the Floor and Ceiling Structure were set incorrectly within the Default Settings. Navigate to Edit> Default Settings and expand the Floors and Rooms category to adjust the Floor and Ceiling Structure for the appropriate room type, floor level, or entire plan.
Changes made to the Floor and Ceiling Structure defaults are dynamic and will apply to the plan automatically as long as the "Default" box is checked in the Room Specification dialog for the Floor/Ceiling Structure setting(s).
- Click OK to confirm the changes, then navigate to Build> Framing> Build Framing
 to rebuild your floor and ceiling framing.
For more information on generating framing in Home Designer Pro, please see the appropriate resource in the Related Articles section below.
To ensure wall framing generates properly
- Using the Select Objects
 tool, select the wall that is not generating framing properly, then click the Open Object
  edit tool.
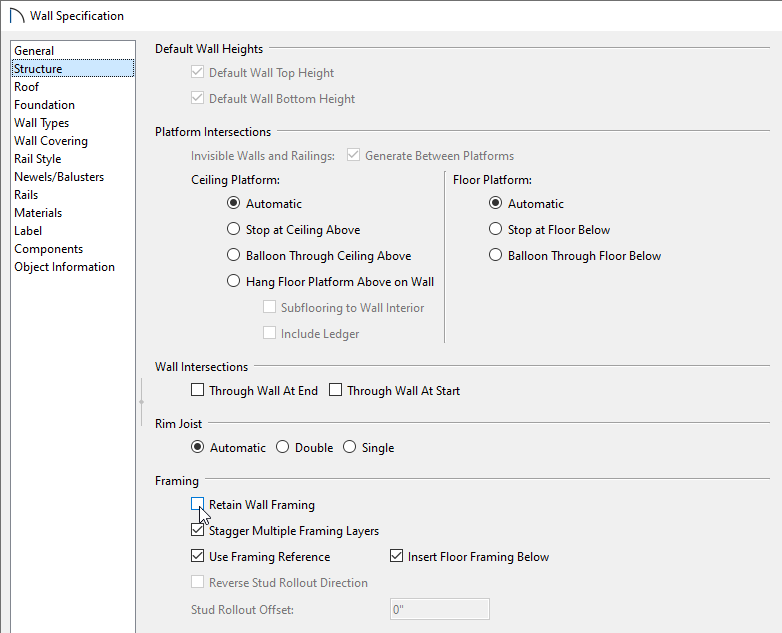
- On the Structure panel of the Wall Specification dialog that opens, verify that Retain Wall Framing is not checked.
If this box is checked, the program will not update the framing for this particular wall when framing is rebuilt.
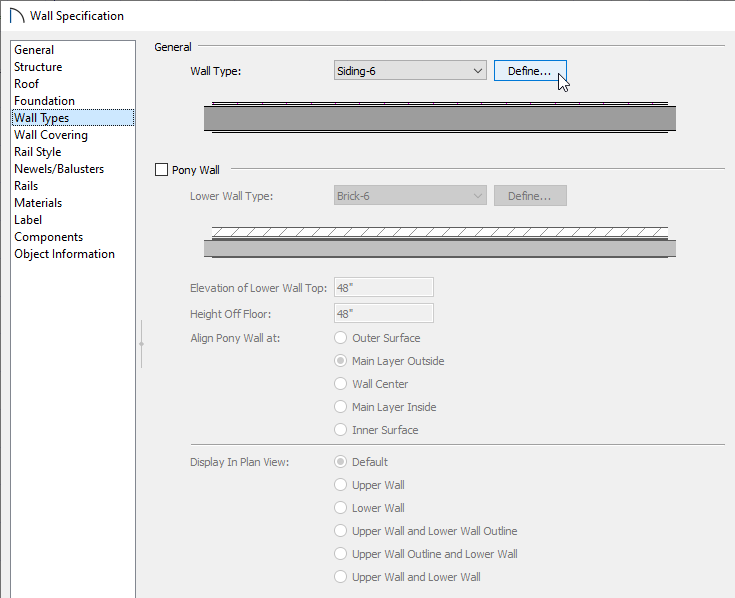
- Switch to the Wall Types panel and click the Define button next to the Wall Type drop-down menu.
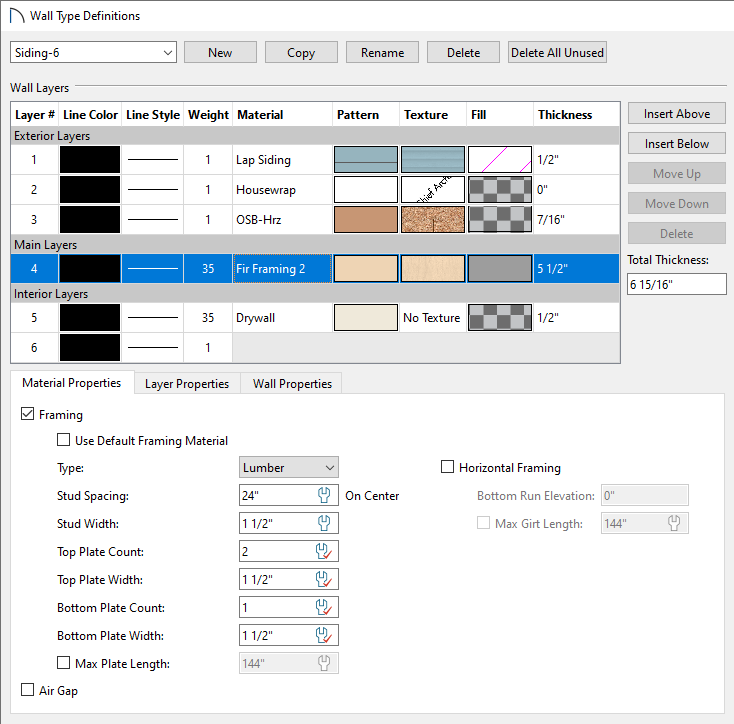
- In the Wall Type Definition dialog that displays, select the framing layer of the wall and verify that the layer has the Framing box checked on the Material Properties tab or within the Material Layer section.
In Home Designer Pro 2021 and prior versions, make sure that the material being used for this layer is a framing material, such as Fir Stud 24" OC.
- Click OK on both dialogs to confirm the changes, then navigate to Build> Framing> Build Framing
 to rebuild your wall framing.
ADVANCED TROUBLESHOOTING
If framing still fails to build after following all of the steps above, then please contact Chief Architect Technical Support using the Technical Support Center.
- If the issue only seems to occur in one particular file, use the Backup Entire Plan/Layout
 tool to create a folder with a copy of the problem file, along with all referenced files.
See Knowledge Base article: Using the Backup Entire Plan/Layout Tool.
- Sign in to the Technical Support Center and create a new support case to send to Technical Support.
See Knowledge Base article: Using the Technical Support Center.
- Give the case a short but descriptive title.
In the text of the case, type a detailed description of the problem. The more detailed you are, the more likely we will be to reproduce the issue and identify the problem.
Click the Browse button and attach the Backup to your case, then Submit it.