Drawing a Plot Plan
Pro | Architectural | Suite
QUESTION
How do I create a plot plan using survey information?
ANSWER
You can create a CAD polyline representation of your plot plan using the distance and bearing information from a survey, then edit the Terrain Perimeter to match it exactly.
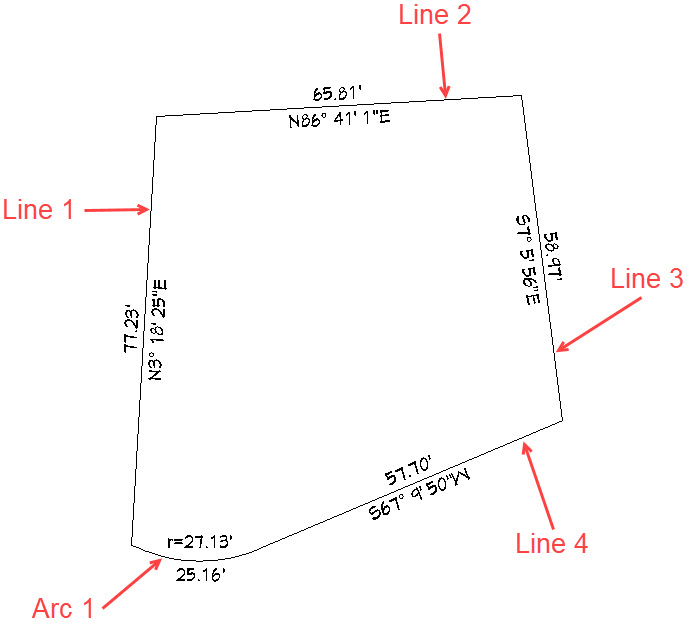
For the purposes of this example, we will use the following survey information:
-
Line 1
Length = 77.23 feet
Angle = N3 18' 25" E
-
Line 2
Length = 65.81 feet
Angle = N86 41' 1" E
-
Line 3
Length = 58.97 feet
Angle = S7 5' 56" E
-
Line 4
Length = 57.7 feet
Angle = S67 9' 50" W
-
Arc 1
Arc Length = 25.16 feet
Radius = 27.13 feet

The image above shows what the completed plot plan will look like, based on this data. We have added the distance and bearing information with text for clarification.
To enter angles using bearings
- To begin, start off by selecting File> New Plan
 to open a new, blank plan.
- From the menu, select Terrain> Create Terrain Perimeter
 to create a basic rectangular terrain.
- Using the Select Objects
 tool, click on one of the Terrain Perimeter's edges to select it, then click the Open Object
  edit button.
- At the bottom of the Terrain Specification dialog, click the Angle Style button.
In Home Designer Pro, select the Number Style button instead.
- In the Angle Style dialog, which opens next, select the Bearing radio button, then click OK twice to close both dialogs and apply your change.
In Home Designer Pro, the Dialog Number/Angle Style dialog will display. Select the Quadrant Bearing option, then click OK.
Angles in all dialogs will now be reported using bearings instead of degrees, as will angle information in the Status Bar.
To enter plot line information
- Select CAD> Draw Line
 and click to begin by drawing CAD Line 1, starting from the bottom of the screen and dragging upwards.
In Home Designer Pro, navigate to CAD> Lines> Draw Line instead.
- You can draw Line 1 wherever you like, but you may find it easiest to draw the entire polyline if it is not located near the Terrain Perimeter.
- If you find that the Terrain Perimeter interferes with your drawing process, click Select Objects
 button, then select the Terrain Perimeter and Delete
  it.
it.
- You can draw Line 1 wherever you like, but you may find it easiest to draw the entire polyline if it is not located near the Terrain Perimeter.
- Once the line has been created, use the Select Objects
 tool to select the line, then click the Open Object
  edit button.
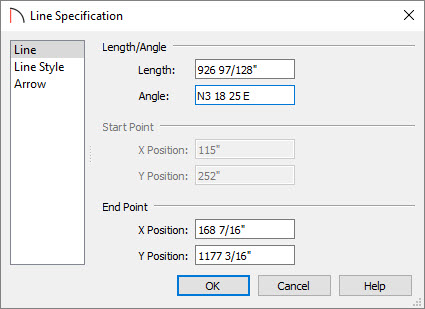
- In the Line Specification dialog:

- Enter the Length information for Line 1.
In this example, 77.23' is specified.
- Press the Tab key on your keyboard to update the dialog and move to the Angle field.
When you press the Tab key, your Length information will automatically convert to inches.
- Enter the Angle information for this line.
Bearing information can be entered in this format: N3 18 25 E which is equal to N3°18' 25" E.
- Click OK.
- Enter the Length information for Line 1.
- Repeat these steps to create Line 2, Line 3 and Line 4, with each additional line starting at the end point of the previously drawn line.
Length, Angle, and other line properties can be adjusted on the Selected Line panel of the Polyline Specification dialog when creating Lines 2, 3, and 4.
To create a curved plot line with a specific radius
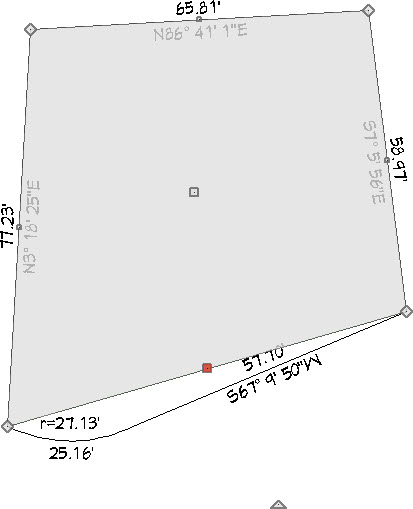
- Next, using the Draw Line
 tool, click and drag to draw a CAD line from the end of Line 4 to the beginning of Line 1 to connect the two.
- Select this line and click on the Change Line/Arc
 edit button. By default, the arc will curve outward.
- With the arc selected, click the Open Object
 edit button.
- On the Selected Arc panel of the Polyline Specification dialog:
- Specify the Radius and Arc Length listed at the top of this article for Arc 1.
- Click OK.
- Specify the Radius and Arc Length listed at the top of this article for Arc 1.
Keep in mind when you go to create your own plot plan, that if you have received the plot plan information from a surveyor, the direction of any given line can be described in two ways using Quadrant Bearings, and not all surveyors will describe the lines of a given plot in the same direction, i.e., clockwise or counterclockwise. If the lines are not described in the same direction, your result will not be a closed polyline.
Your plot plan is now complete, but because it is a 2D CAD polyline, it can only be seen in plan view. To create a 3D object that can be seen in 3D camera views, you can edit the shape of the Terrain Perimeter to match the plot plan polyline.
To view the plot perimeter in 3D
- If you deleted the Terrain Perimeter to make it easier to draw your plot plan polyline, select Terrain> Create Terrain Perimeter
 to create a new one.
Note: In Home Designer Pro, a closed polyline, such as the one created above, can be converted to a terrain perimeter. To do this, select the polyline, click on the Convert Polyline edit tool, then select the Terrain Perimeter option in the dialog that appears. If a terrain perimeter already exists or a polyline is not fully enclosed, this option will be grayed out and inaccessible.
- Using the Select Objects
 tool, click on one of the Terrain Perimeter's edge lines to select it, then click and drag the Move
  edit handle at its center so that the Terrain Perimeter is positioned over your plot plan polyline.
- Next, click on the edit handle in the top left corner, and drag it to the top left corner of your polyline at the end of Line 1.
- Similarly, drag the top right edit handle to the end of Line 2, the bottom right edit handle to the end of Line 3, and the bottom left edit handle to the beginning of Line 1.
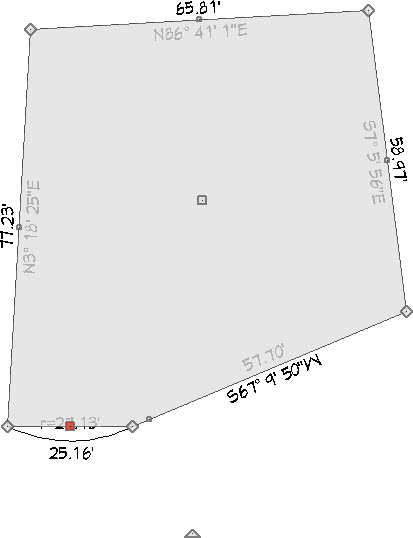
- After you have done this, select the bottom line of the Terrain Perimeter, select the Add Break
 edit tool, then click on the bottom line near the plot plan arc to create a new corner handle at the point where you clicked.

- Now you can click and drag this new diamond shaped edit handle to the end of line 4.

- Select the new line segment that needs to become the arc and click click the Change Line/Arc
 edit button, as you did earlier to create the arc in the plot plan.
- Finally, with the new curved segment selected, click Open Object
 edit button and on the Selected Line/Arc panel of the Terrain Specification dialog:
- Enter the same Radius and Arc Length values as you did for the plot plan polyline.
- Click OK.
- Enter the same Radius and Arc Length values as you did for the plot plan polyline.
If you wish, you can use the Text  tools in plan view to add length and bearing information for each edge of the plot plan.
Home Designer Pro has the ability to show the length and bearing of each polyline edge. Check both the Show Length and Show Angle boxes on the Line Style panel of the Polyline Specification dialog.