Placing Objects on Shelves
Pro | Architectural | Suite
QUESTION
I would like to place objects on top of the shelves in my Home Designer plan. How can I accomplish this?

ANSWER
Decorative items can be arranged inside of cabinetry and on shelving in a few easy steps. To accurately place objects onto shelves, you may find that a combination of moving them in your 2D floor plan view as well as in a 3D camera view will best achieve the results that you want.
To move objects on to shelves
-
If you have not placed shelves in the plan, select Build> Cabinet> Shelf
 from the menu, then click in the drawing area to place a shelf at that location.
A selection of shelf objects is also available in the Library Browser at Home Designer Core Catalogs> Interiors> Furniture> Storage Furniture> Shelving.
- In the Library Browser , browse to an accessory item that you would like to place on the shelving, and select it.
For the purposes of our example, we selected accessories like books, baskets, and vases.
Many accessory items can be found by navigating to Home Designer Core Catalogs> Interiors> Accessories.
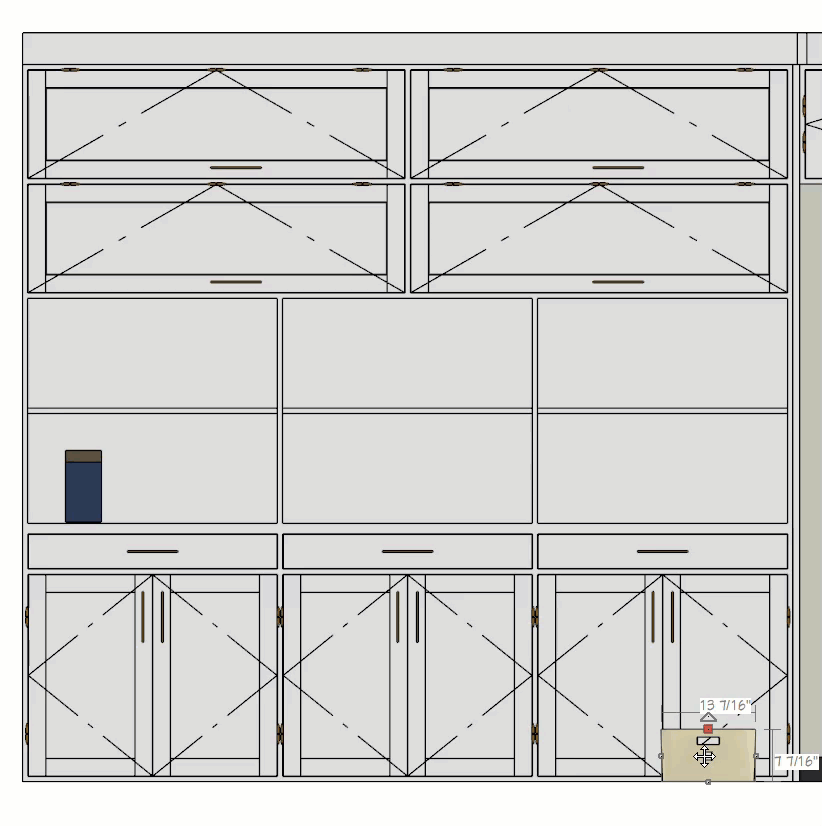
- Click in an empty space in your drawing space, either on or near the shelves you will be placing the item on.
Note: If you have only one shelf at that location, accessory objects will locate the shelf and rest on top; however, if you have more than one shelf at that location, or if you want to place objects inside of a furniture object or a cabinet, it's often easiest to place the objects nearby and then adjust their heights and positions.
- Go to 3D> Create Camera View> Elevation
 or Wall Elevation
  , and click and drag towards your furniture and accessories to create an elevation view that shows these objects.
In Home Designer Pro, instead go to 3D> Create Orthographic View> Wall Elevation and click and drag towards your furniture and accessories to create an elevation view that shows these objects.
- In the elevation view, use the Select Objects
 tool to select your object, and using the Move
  edit handle, move each object up/down or left/right to your desired location.
For more information on easily positioning objects, please see the Related Articles section below.
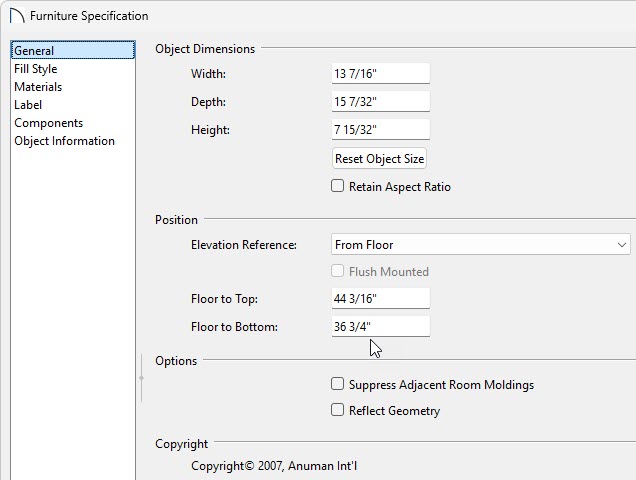
- Additionally, you can also specify an object's Floor to Bottom height, which is its height above the floor in it's specification dialog.
You can easily determine the value to specify for the Floor to Bottom value for the object to be placed on the shelf by adding the height of the shelf and its thickness together.
- When the objects are at the correct heights, return to floor plan view and use the Select Objects tool to select and make any needed adjustments to their positions.
- Hold down the Control/Command key down on your keyboard to override any movement restrictions, and place your cursor over the Move edit handle at the center of the selected object.
- If you move an object into the center of a furniture or cabinet object, or underneath a shelf, it will not be visible in floor plan view when it is no longer selected. This is known as the Draw Order. For more information on adjusting and object's draw order, please see the Related Articles section below.
You can also hold down the Shift key on the keyboard and click on several items to select a group of objects.
Groups of objects can also be selected by holding down either the Shift or Ctrl/Command key when the Select Objects tool is active and then dragging a marquee around the objects to be selected.
- Hold down the Control/Command key down on your keyboard to override any movement restrictions, and place your cursor over the Move