Creating Barrier-Free Cabinets
The information in this article appliesto:

QUESTION
How do I create barrier-free cabinets?

ANSWER
There are a number of ways to customize cabinets so that they meet your accessibility needs.
Lowering the cabinet and countertop height, along with increasing the size of the toe-kick helps wheelchair users access base cabinets more safely, easily, and efficiently.
To create base cabinets that accommodate wheelchairs
-
Select Build> Cabinet> Base Cabinet
 from the menu, then click to place a base cabinet in your plan.
- Using the Select Objects
 tool, click on the cabinet to select, then click the Open Object
  edit button.
- On the General panel of the Base Cabinet Specification dialog that displays, specify the desired Height of the countertop.
In this example, 34" is used.

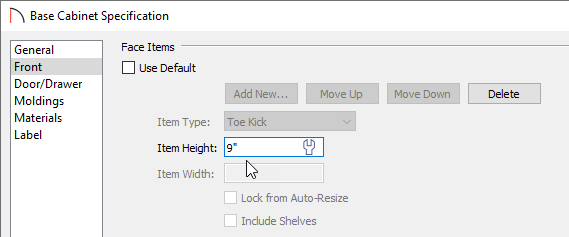
- On the Front panel, click on the toe kick at the bottom of the preview image on the right side of the dialog, then specify its Item Height.
In this example, 9" is used.
- On the Door/Drawer panel, you can specify horizontal or vertical pull handles if you wish.
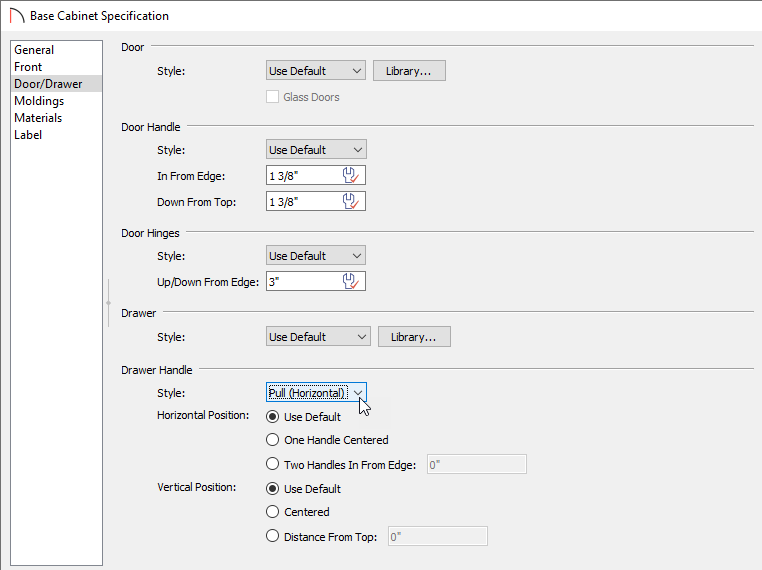
Pulls are easier for many individuals to use than knobs because they do not require a strong grip.
Note: Check the cabinet preview to make sure your handle is positioned properly. Use the "In From Edge" and/or "Down From Top" fields to adjust its positioning.
- Create a Camera
 view to see the results.
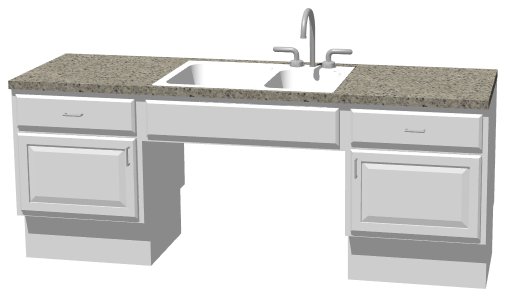
Leaving the space beneath a sink basin or cooktop open allows a wheelchair user to conveniently and safely use these fixtures.
To create a barrier-free sink or cooktop base
- Using the Select Objects tool, click on a base cabinet that you would like to use as a sink base to select it, then click the Open Object edit button.
- On the General panel of the Base Cabinet Specification dialog that displays:
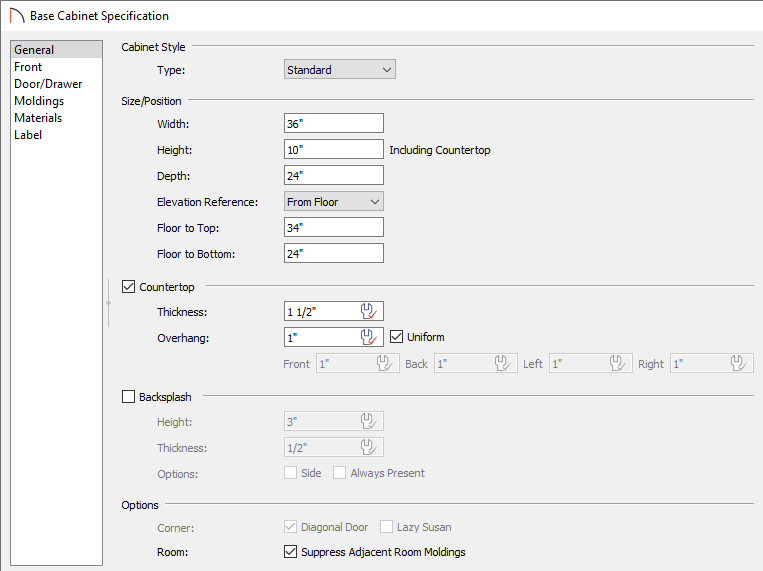
- Specify a Width sufficient to hold the sink that you wish to use.
In this example, 36" is used.
- Specify the Height of the cabinet, measured from the bottom of the cabinet to the top of the countertop.
In this example, 10" is used.
- Specify the desired Floor to Bottom distance, measured from the bottom of the cabinet down to the floor. This value should be enough to accommodate a wheelchair user's knees.
In this example, 24" is used.
- Specify a Width sufficient to hold the sink that you wish to use.
- On the Front panel, click on the toe kick at the bottom of the preview image on the right side of the dialog, then click the Delete button.
- Next, click on the drawer face item in the preview, change the Item Type to the Drawer - False option using the drop-down.

- On the Door/Drawer panel, change the Drawer Handle Style to None, then click OK.
- If it's not already open, select View> Library Browser
 from the menu, then browse to Architectural> Plumbing Fixtures> Sinks> Kitchen Sinks and click on a kitchen sink to select it.
- In this example, the Offset Undermount Sink sink is used.
- Alternatively, you can browse to Appliances> Cooktops & Rangetops.
- In this example, the Offset Undermount Sink sink is used.
- Click on the sink base to place the selected sink or cooktop in this cabinet.

- Create a Camera view to see the results.
When placing cabinets in your plan, remember to maintain enough space between cabinet rows to allow a wheelchair to maneuver freely. When accessing storage in wall cabinets, it's typically easiest to reach from the side of the wheelchair; however, when opening an appliance, preparing food or working at a sink or cooktop, reaching forward is often preferable.
Remember, too, that doorways should be wide enough for a wheelchair to pass through, and that some space should be available for a wheelchair to turn around. A circle with a 5 foot diameter is recommended.